USERGUIDE
Getting Started
To get started, create a PriceDonkey Free Trial Account by visiting pricedonkey.net. Register your account and follow prompts. Make sure to check your spam folder for verification email.
Welcome to PriceDonkey!
You’ll be prompted with a PriceDonkey Product Tour. To take the tour, please click “Take Product Tour”. If you want to dive right in, please click “Skip”. If you don’t want to see this pop-up again, please click “Don’t show this next time”.
The Product Tour will walk you through the left navigation bar:
Master Sheet
This is where your Master Price Sheet will live after data is imported and organized.
Active
This is where you activate, deactivate and see the status of your imported price lists.
Import
This is where you’ll import, map and submit your prices list files.
Vendors
This is where you’ll manage your vendor list.
Users
This is where you’ll manage PriceDonkey users.
Settings
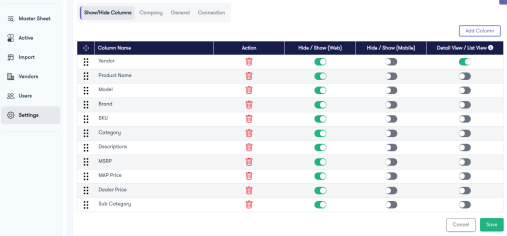
This is where you determine the data you’d like captured in your Master Price Sheet. We’ve added a few “Column Names” for convenience. You can add or delete default “Column Names”.
Step 1: Settings
Begin with the “Settings” tab on the left navigation bar. This is where you determine the data you’d like captured in your Master Price Sheet. We’ve added a few Column Names for convenience. You can add or delete default Column Names. To delete a Column Name, click on the red trash can. To add a Column Name, click “Add Column” in the top right.
You have the option to Hide / Show Column Names on the Web and/or the Mobile version. In addition, you have the option to show a more detailed view on the Mobile version by toggling between “Detail View / List View”.
*Tip: Think of the data you’d like to ultimately export from your Master Sheet. You get the option to map only necessary fields and ignore the rest. You can always go back and add, delete, show or hide columns.
Step 2: Import Your Price Lists
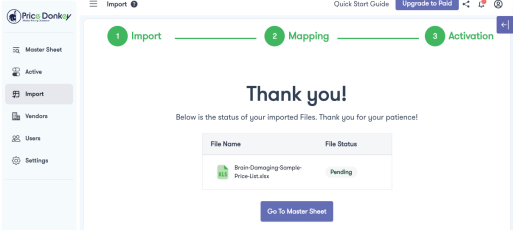
Click on the “Import” tab on the left navigation bar. Drag and drop or select price list file from your computer. Click next and follow prompts to add Vendor Name and Submit Price List. You will be notified by email when your price list has been verified by our system.
*Tip: Accepted file formats include CSV, XLS and PDF. The maximum file size is 40 MB. Depending on the complexity of your file, it may take up to 12 hours to process.
Step 3: Activate Your Price Lists
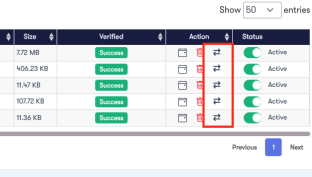
By clicking on the “Active” tab, you can schedule a price list activation date or toggle it immediately to “Active” or “Inactive”. You can also view the verification status of your price file (you will not be able to Activate your price file until it’s been verified).
This is also where you can download and view your original uploaded price file.
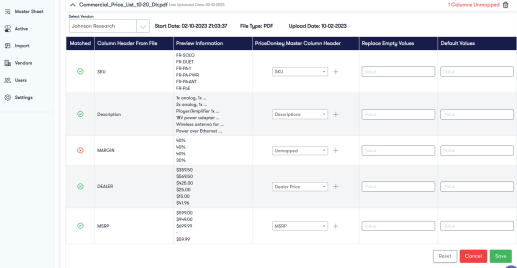
Step 4: Mapping Your Fields
Click on the “Active” tab and under the “Action” header click on left/right arrows next to the file you want to map.
This is where you map your original file form field headers “Column Header From File” to the PriceDonkey “Master Column Headers”. You can add, edit, delete and mass find/replace “Master Column Headers”.
Step 5: Your Master Price Sheet
View all “Active” price list files with mapped “ Master Column Headers” on the “Master Sheet” tab.
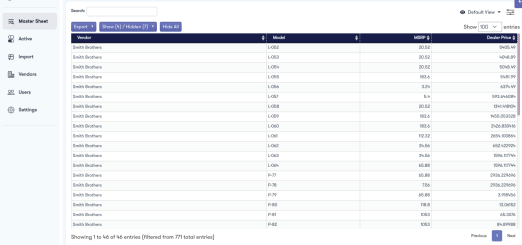
Filter the Master Sheet by “Vendor” or “Category” by clicking on the menu in the top right.

Master Price Sheet Continued
Show or hide “Master Column” names using the “Show/Hide” button.
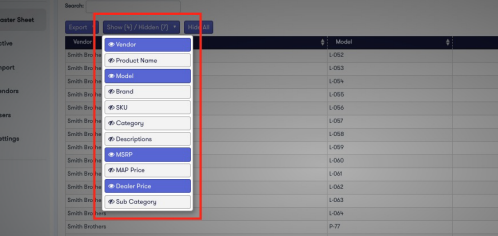
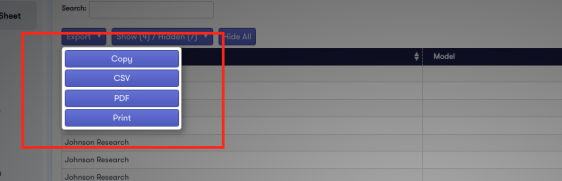
Export to a CSV or PDF file, print or copy the Master Sheet data by clicking on the “Export” button. You now have a completely formatted, organized and ready-to-upload master price list you can add to your CRM or accounting software.